Portrait Photography | The Art of Backlighting
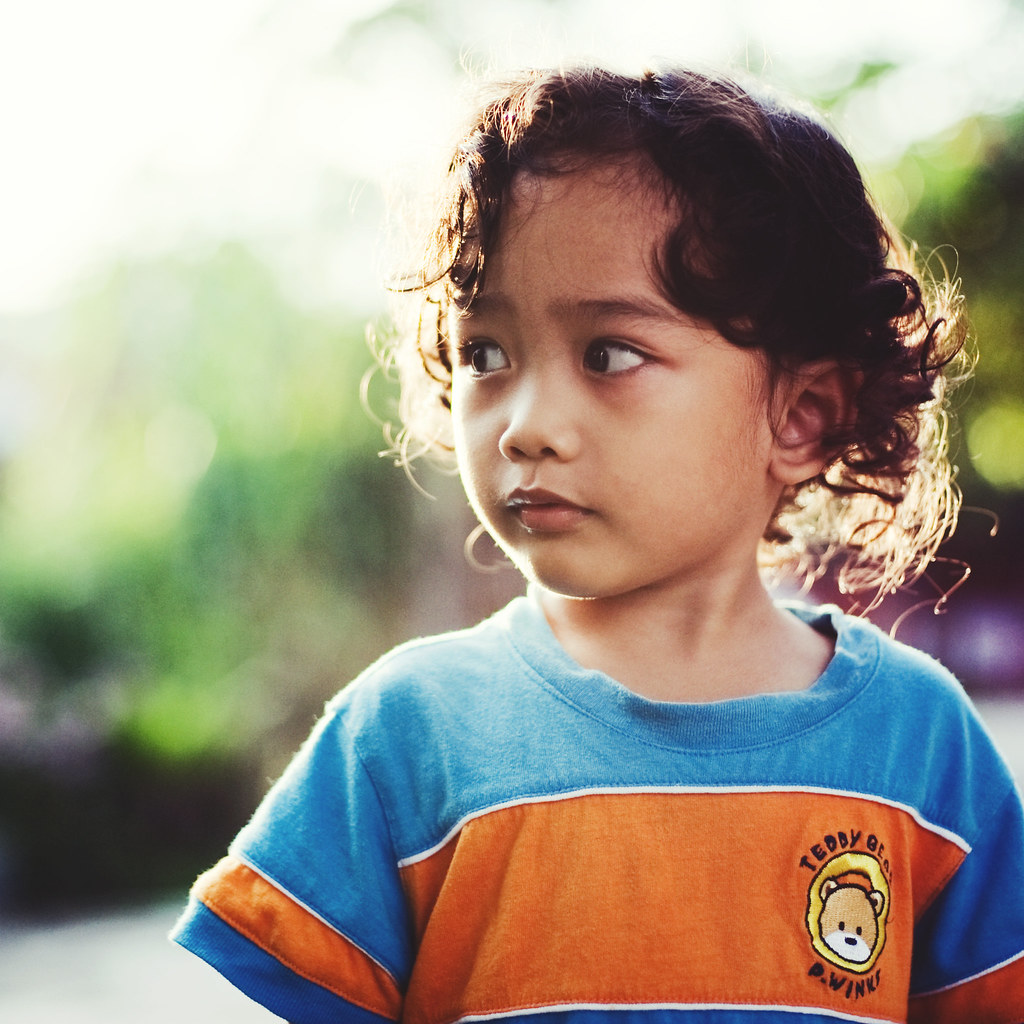
© 2011 Wazari Wazir | Portrait of My Son | ISO 200 | F2 | 1/1250
What is Backlighting? As the name suggest, Backlighting refers to lighting in a photograph that comes from behind an object or a person. The lighting can be from many source, it can be a natural light or artificial light as long as the main source of the light coming from behind the subject, it is called a backlighting. Most of the times backlighting comes from ambient light around the subject of the photograph. If you look at the picture of my son above, the lighting coming from the early morning sunrise which is from the right side of my son.
Some photographers hate backlighting because it fools their camera metering, if we like to experiment with backlighting, we should try to forget about using fully AUTO or PROGRAM Mode since most of the time the result is undesirable, your subject will be too dark or worse will look like a silhouette. The camera will assume that there is a strong light coming from behind the subject and adjust the exposure to use fast shutter speed or to use small aperture or a combination of both which in the end will make your subject left in shadows or become a silhouette.
You still can use Program Mode but make sure you use the Right Metering, I mean in-camera metering, for best result use Spot Metering where you take the reading from the face of the person, if possible from the Mid-Tone area of the subject face. Use Manual Exposure for best result, make sure also to use Spot Metering in the camera and take the reading from the subject face, not from the highlight area but Mid-Tone area, where it is not too bright or too dark.
For my son picture above I took the reading from his cheekbone, the aperture that I use is f2 at ISO 200 and the shutter speed is 1/1250 with 50mm lens. If you can see, the right cheekbone of my son is blown out, there were no details in it, for me that is acceptable since you will never get the right or perfect exposure from this tricky lighting conditions. If I were to get the exposure right for my son right cheekbone, the overall result will put his face in shadows, it will be too dark. So I need just the right exposure for certain part of the picture and I can’t have everything right or spot on.
Some of you might say, why don’t I use fill in flash to kill the shadows on my son face or why I don’t use a reflector to add fills light to his face. That is very good question, actually you can do that if that is what you want to do but I choose not to, I like this kind of effect, I like this kind of result. Yes, you can have much more beautiful picture with the help of fill in flash but when you kill the shadows with artificial light source, you will also kills the mood which I don’t like to. The number one reason why I like to play with backlighting is because I want the “mood”.
Actually this is not a good backlighting picture, there is a lot of rooms for improvement but I think we can learn a lot from not so perfect photograph than a good one. I wish I can position him at a better place but I cannot simply pick him and put my son to a “perfect” position so that I will get a better photo, I just can’t do that because my son is not a statue.
If you can see from the picture above, the hair on the left side of my son is much more interesting to look at compared to the glowing hair in the right side of his face. The reason is that, my son hair on the left side of his face, stand out from a dark background while the hair on the right side of my son almost blend together with the “light” background which is the sky.
So what can I do to improve the shot? Lets say you are shooting a gorgeous looking model with a lush blonde hair, to really make full use of the backlighting so that the hair will be glowing like gold, position the model where her head is not directly in front the light source, which in this case the sun. Make sure there is something behind her head, I mean not an empty white space of the sky, if possible something dark, a trees or a house for an example, so her strand of hair separated nicely from the background, the idea is that, not to let the hair blend together with the “light” area of the scene.
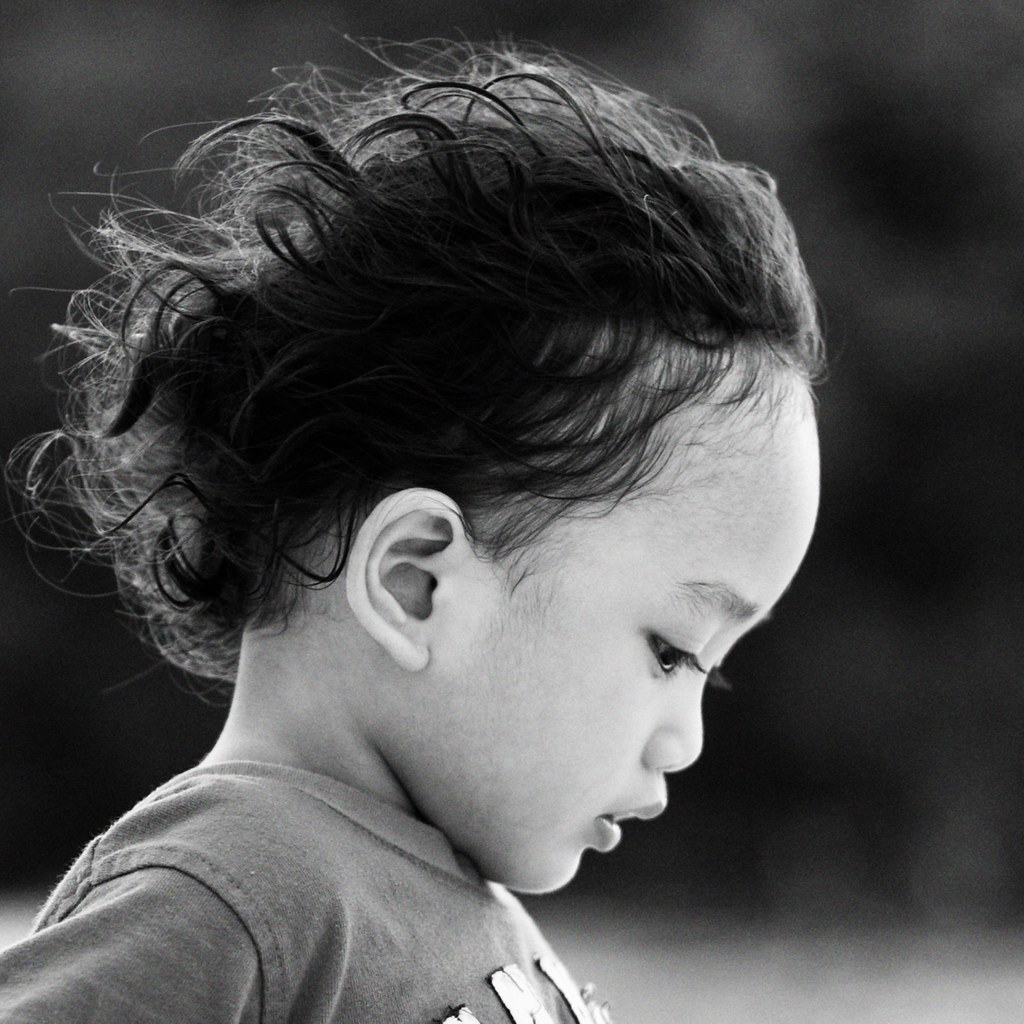
© 2010 Wazari Wazir | Against The Wind | Langkawi
To make it easy for you to understand, I’m sharing with you a picture of my son taken last year in Langkawi, here I choose a dark background, so that the strand of hair of my son clearly separated from the background. They are not blend with the sky. What happen if I choose white sky for the background? For sure you can imagine the outcome. So choose the background carefully, and you will be rewarded with much more interesting backlighting photograph.
I think you should get the idea by now, if you choose to use reflector or fill in flash, that is your own choice. You may have your own intention or your very own vision regarding the way you wanted to photograph your subject. This is what I like to do, no reflector, no fill in flash, just make full use of the natural light. I’m not looking for a technical perfection here, I just want to captured the mood and I just want to have fun. Sometimes with all those gadgets, you loose the fun, fumbling with your equipment unless you are shooting for a commercial, then, it is another story.
Related Post : Against The Wind

Get The Secret HERE
9 Comments
mujahid
cool, can’t wait 🙂
Jeffrey K. Edwards
Wazari –
I love this image of your son! It has spot on focus with great control of the depth of field and beautiful bokeh. The lighting is perfect! It can be hard to expose correctly in this situation and still capture the rich colors & tone of your subject.
Well done my friend!
~ jeff
bukulima
nice potraiture bro, x sabar tunggu post selanjutnyA 🙂
aswad
encik wazari, tips yg sgt bagus..sy pn baru je nk belajar2 guna backlighting..mmg langkah kanan jgk la kali ni..hehehe.terima kasih byk2.sy sgt berminat ngan hasil kerja encik wazari.terutama tone2 soft yg encik guna.nanti klu buat kelas tone nak join..:D
nk tumpang tnya, bagaimana nk menghasilkan tone yg consistent? kerana sy tgk tone2 yg encik hasilkan sgt konsisten. adakah encik edit setiap gambar secara berasingan atau hanya menggunakan action?terima kasih:)
Wazari Wazir
@ Aswad, tentang Tone tu kalau you tengok balik tak konsisten sebenarnya, tonenya berbeza mengikut gambar yang kita ambil. Semua gambar yang saya edit Tone diedit secara berasingan, saya tidak menggunakan action, cuma yang mungkin buat Tone saya nampak agak konsisten ialah kerana saya biasa menggunakan Natural Lighting yang agak konsisten, dalam suasana yang tidak terlalu terang, dalam keadaan yang mendung atau under shade area…
aswad
ouh begitu..makasih ya encik wazari:D akan saya cuba praktikkan:)
KNizam
digicam x boleh nak produce good backlighting mcm ni hehe 🙂
Wazari Wazir
@ KNizam, kalau digicam tersebut boleh kita setkan manual Exposure Control rasanya tak jadi masalah tapi kalau Digicam kita hanya beroperasi melalui Auto Mode susah sikit kerana kebiasaanya subjek akan jadi gelap. Digicam akan “assume” yang subjek kita berada di tempat yang cukup terang dan banyak cahaya, jadi dia akan “compensate” untuk itu dan hasilnya gambar subjek gelap sedikit.
Pingback: