Photoshop Editing | Before and After
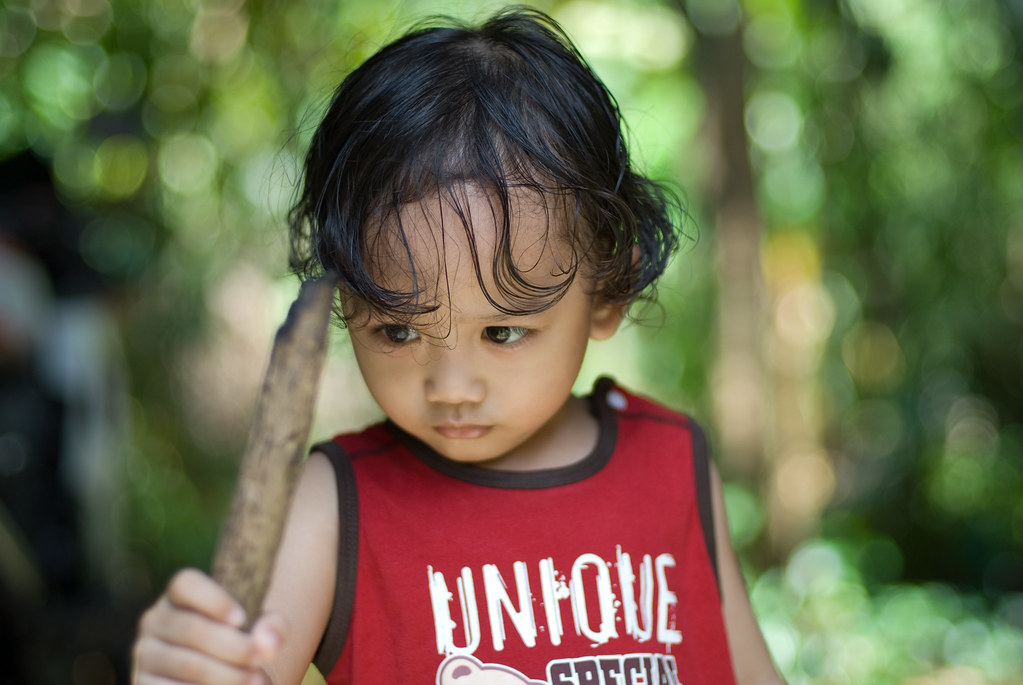
© 2010 Wazari Wazir | Original RAW NEF | Unedit | Just Convert To JPG
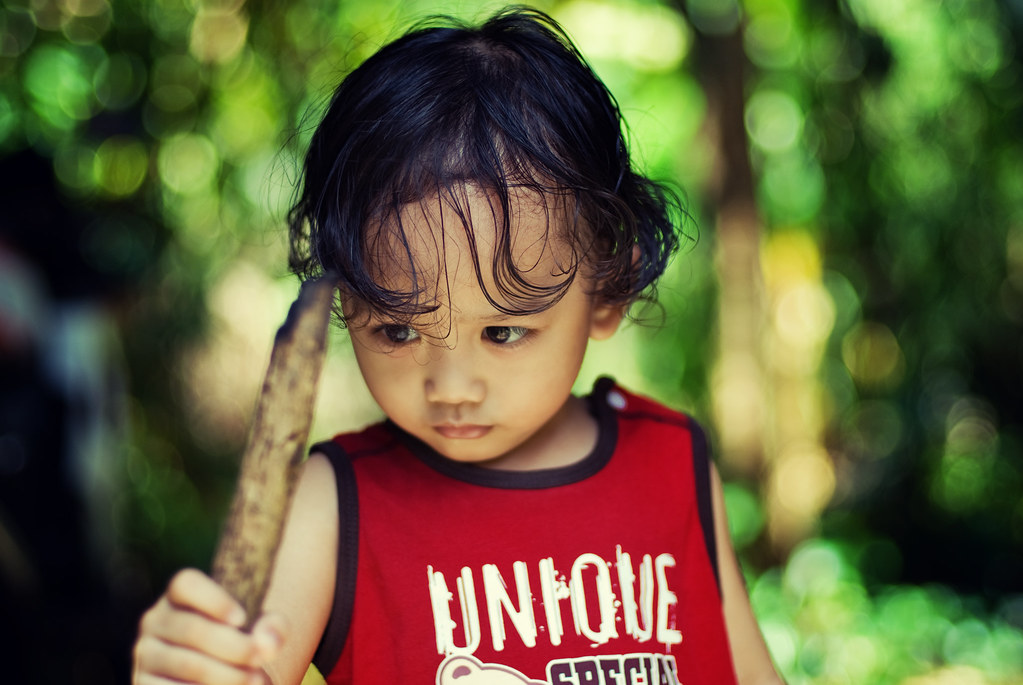
© 2010 Wazari Wazir | After Editing With Photoshop Tone
I’m not a businessman and because of that I don’t know about marketing, about promotion, about getting attention, maybe because I’m not a full time working on my own as a photographer, I’ve another income, so I don’t need to worry about promotion. What the heck am I talking here? Am I supposed to talk about before and after editing? Yes, it’s true but the purpose is to sell my eBook, I’m not being hypocrite here, this post is all about selling my eBook, I’m sorry about that. I hope you don’t mind.
But I will give you something free, you don’t need to pay for this tips. Just read on. Ok, like I’ve wrote in my previous article, I did shoot most of my son pictures in RAW Format or NEF for Nikon camera. As you can see from the top picture, it is RAW file, unedit, I just convert the RAW file to JPG, as you can see it here, I can’t upload and Share RAW files here, you can’t see it unless I use screen capture but the quality will be loss, so I just convert my NEF or RAW file into JPG in Photoshop, just that, no other editing.
As you can see from my original file, the Bokeh is real, I’ve never “Fake” my Bokeh, it is real Bokeh from my camera. It was very easy to get Bokeh if you know some basic camera operation, use wide open aperture, like f2.8 or f1.8 and make sure that your subject and the background are a distance apart, like my son picture above, the distance between my son and the background is somewhere around hundreds meters. I did not use reflector here and just like every picture of my son, I’ve never use reflector to fill the light into my son face. The tricks is to know where the lighting is coming from and play with it. The lighting is a bit harsh actually, that’s why I need to find a shade area for my son, by now you should get the “tips”.
About the editing, the first thing I do is open my picture in ACR or Adobe Camera RAW and just make some “Global Adjustment” or general adjustment, like brightness and contrast, simple editing basically. Then opening my picture in Photoshop, duplicate another layer with the same picture, so now I have two layers with the same picture. After that I change the top layer blending option from “Normal” to “Soft Light”. That’s how I got a “Lively” green Bokeh back there, can you see the difference? Just two layer with “Soft Light” blending option makes all the difference but I’m not finished yet.
“Soft Light” blending option for portrait have it “drawback”, meaning that most of the time the face will get too saturated, and doesn’t look natural, so in order to prevent this from happening, I need to apply “layer mask”to the face, I don’t need the face to get over saturated, so I “mask” it and just let the background to get all the effect of “Soft light” and leave the face just like original.
After masking the face, then I just flatten the image and then combine it with the Tone, actually with “Soft Light” blending option you can finish your editing already but if you want something different, that’s where the Tone come into play. How to tone the picture, get my eBook like I’ve told you in my first paragraph.

Get The Secret HERE
3 Comments
Ahmad Azrul
sdr wazir, apakah pendapat sdr tentang workshop fotografi yg mendatangkan host terkenal Rarindra Prakasa sebagai fasilitator. Jika tidak salah sdr wazir pernah mempromosi workshop yg seumpama ini beberapa thn yg lepas.
Andz
Thanks bro for the tip. Saya selalu juga main dengan blending option ni.. Soft light ataupun overlay memang pilihan terbaik.. Cuma belum dapat feel dgn color2 tone ni. Masih dalam try & error.
admin
Ahmad Azrul : Terima kerana singgah di Blog saya, pertama sekali, saya tak pernah mempromosikan Workshop Rarindra beberapa tahun yang lepas, cumanya saya pernah menggunakan ayatnya ataupun pernah membuat sedikit ulasan berkenaan dengan Workshop yang dijayakan oleh semasa Photography Exhibition di Times Square kalau tak silap. Saya tertarik dengan cara penyampaiannya.
Tentang pendapat saya secara peribadi tentang menjemput Rarindra Prakarsa sebagai fasilitator ke Malaysia, saya rasa adalah satu perkembangan yang sihat, perkongsian ilmu yang sihat. Di Malaysia pun ramai yang hebat, ramai yang berbakat dan ramai juga yang sering melakukan Workshop persendirian dari masa ke masa dan oleh kerana ada penganjur yang berjaya membawa masuk Rarindra ke Malaysia bagi saya adalah perkembangan yang sihat, banyak yang boleh kita belajar darinya, daripada kejayaannya.
Bagi saya secara peribadi tiada salahnya untuk menambahkan ilmu dari sesiapa sahaja asalkan ianya mendatangkan kebaikan.